Southwest National Parks: 4 Day Southwest Road Trip

A white car drives along a road heading towards a large rock formation near Zion National Park

There was a time in my life when I thought road trips were a form of punishment. Like, why spend your vacation driving around?? Oh, silly younger self. This trip out west to explore some of the southwest national parks forever changed my mind on road trips. Whether you’re new to the road trip life or have been rocking them for years, this 4-day southwest road trip itinerary is a must. So grab your favorite road trip partner (my co-pilot was my mom!), and let’s hit the road!

∗ Some of the links in this post are affiliate links. Purchasing through these links earns me a commission at no extra charge to you. ∗

Images of the sunbeam shining through Antelope Canyon, the base of the Angels Landing hike in Zion National Park, Horseshoe Bend, and a lookout point from inside the Grand Canyon

DAY ONE: Las Vegas to Zion National Park

Las Vegas is an excellent hub to kick-off any southwest trip. Its location makes it easy to jet off in any direction you wish to head, and most major metropolitan cities offer convenient and cheap fights there. The DC area (where I’m based) is no exception, so it was a no-brainer to make Las Vegas the kick-off spot for this southwest national parks adventure. After arriving at McCarran International Airport, we promptly picked up our rental car and hit the road. The first stop on this southwest road trip was Springdale, Utah, which is home to Zion National Park. The 3-hour drive from Las Vegas to Springdale is an easy, scenic drive. I’m talking mainly highways with 70 mph speed limits and light traffic. Basically, this road tripper’s dream!

Springdale, Utah Hotels: Where to stay near Zion National Park

The entrance to Zion National Park is right at Springdale, which makes this the place to look at when searching for where to stay near Zion National Park. There are several national hotel brands with properties in Springdale, as well as smaller independent owned lodges, Bed & Breakfast lodging, and of course, Airbnb rentals. If camping is more your style, check out Zion Canyon Campground right at the entrance to Zion National Park. If camping, remember this part of the park is desert and temps can soar in the summer months. On this visit to Zion, we chose to stay at the La Quinta Inn & Suites by Wyndham at Zion Park/Springdale, located about a mile from the park entrance. This property offers nice rooms, a decent-sized pool, and free breakfast (complete with a waffle bar!).

New to Airbnb? Use my Airbnb code to get $40 off your first booking plus $15 off an experience worth $50 or more. There’s no extra charge to you, and I’ll receive a discount on my next booking as well. It’s a win/win!

A man sits on the outdoor patio at Zion Canyon Brewing Company outside Zion National Park
The mountains of Zion National Park are the prefect backdrop while enjoying local craft brews at Zion Canyon Brewing Company

Springdale, Utah Restaurants

Springdale does not lack in the restaurant department, and the best part is there are no national chains to be found. Enjoy homestyle cooking on the patio at Meme’s Café or head to Whiptail Grill for Mexican dishes that will definitely fill you up (I’ve never seen so much Mahi Mahi on a taco before!). After a day of flying from DC to Las Vegas, then driving to Springdale, a burger and cold beer was all this weary traveler wanted, and Zion Canyon Brewing Company did not disappoint. Zion Canyon Brewing Company is right at the park entrance. Depending on where you’re staying (or how many beers you’re in the mood for), you can walk, take the free shuttle, or drive (there’s free parking for patrons). The iconic Zion red rock formations are the perfect patio backdrop for enjoying a flight of locally brewed beers.

Things to do in Springdale, Utah

Most likely, if you’ve come to Springdale, you’re there for Zion. But if you need a break from the outdoors, swing by the Zion Human History Museum (located inside the park) to learn the history of Zion National Park. My favorite non-outdoorsy thing to do in Springdale is to stroll through the shops in town. Each artisan shop in Springdale has a unique vibe. If you’re into cute jewelry for a reasonable price, Zion Canyon Offerings (933 Zion Park Blvd) is the place for you. I receive compliments every time I wear the rings I purchased there!

Get monthly travel tips & ideas straight to your inbox.

DAY TWO: One Day in Zion National Park

You know how they say the early bird catches the worm? Well, that’s absolutely true here! Except, instead of the worm, you catch a shaded trail for your trek. Rise with the sun and catch the shuttle to the entrance of Zion National Park. The town runs the shuttle, which makes several stops along the main stretch of Springdale to take you to and from the park entrance. There isn’t much parking near the entrance (and the available spots aren’t free), and during prime tourist season, personal vehicles aren’t permitted throughout the park. Your options are to take the shuttle or walk. Since you’ll be doing plenty of walking once inside Zion, give yourself a little break and take the shuttle! Shuttle stops are marked along the main road heading to the park and run approximately every 20 minutes – extremely easy, convenient, and best of all, FREE! Note: This is not the same shuttle as the one you will take inside the park to get to the different sections of Zion.

At the main entrance to the park, you’ll pay your park entrance fee or flash your National Parks Pass then follow the signs to the shuttle to travel into Zion National Park. Your entrance fee is good for seven days, so be sure to save your receipt if you plan to re-enter Zion or visit another national park. As mentioned above, during the busy seasons personal vehicles are not permitted in the park. This shuttle is your only option to access the different areas within Zion.

looking down into the valley from Scout Lookout in Zion National Park
The view from Scout Lookout on the way to Angels Landing in Zion National Park
A narrow path along the side of a mountain in Zion National Park
The start of the final climb to Angels Landing. So narrow!

Hiking Angels Landing

Angels Landing was my big “must do” on this Zion National Park visit. It’s a 5-mile roundtrip hike with steep elevation gain, but the view of Zion’s valley from the peak of Angels Landing is totally worth the work. The first two miles take you on the West Rim Trail and are a combination of elevation gains and switchbacks. The trail is well maintained, wide enough for people to pass each other, and there aren’t many areas with sharp drop-offs. I highly recommend starting this hike early. We were on the trail by 8:30 am and were blessed with shade for a good portion of our climb. By the time we descended, there was no shade left on the trail. Trust me, in the hot summer heat you will seriously appreciate the shade! After the 2-mile trek, you’ll reach Scout Lookout, which offers impressive park views. For those hiking with small children, physical constraints, or with extreme fears of heights, this is as far as you’ll want to go. The conditions change drastically for the final half-mile to Angels Landing. This portion of the hike is extremely narrow, with steep drop-offs. There are several places where there’s only enough room for one person to pass at a time (you go up and down via the same route), and there are sections with chains drilled into the surface for extra climbing assistance. Once you reach the top, it is wider and there is room to safely roam around without getting too close to the edge or running into other hikers. I feel like this goes without saying, but after witnessing someone try to take a toddler up this section, I think it is important to state: This portion of the hike is not appropriate for small children (even if you have them in a carrier).

People walk in a narrow river running between the canyons in Zion National Park
The start of The Narrows hike

Other things to do in Zion National Park

After we descended Angles Landing, we hopped on the shuttle and took it to the Temple of Sinawava, the last stop in the park. From there, we hiked the easy, 1-mile Riverside Walk trail (this one is paved and mostly flat) to the start of The Narrows. The Narrows is a hike through the gorge, which you do literally in the Virgin River. It can take all day, and you’ll need appropriate gear. At a minimum, you will want good water shoes and a walking stick, and if it’s colder, a wet suit. Rental equipment is available at Zion Outfitter at the entrance to the park (rentals start at $25/day). We chose not to do The Narrows this visit but vowed we’d be back. We hopped back on the shuttle to make our way towards Springdale, jumping off at the Zion Lodge stop to do a short hike to the Lower Emerald Falls, which is a relatively easy hike. Unfortunately, this was during the dry season and the lower falls weren’t flowing. We chose to forgo continuing to the Upper Emerald Falls and returned to town to get a late lunch (protein bars, nuts, and beef jerky can only get this girl so far!).

TIP: I highly recommend planning more than one day for Zion National Park. I regretted not planning at least one extra day. The Narrows is definitely something you’ll want to experience. If you’re looking for another hike with an excellent view, consider Observation Point, which has a higher elevation than Angels Landing minus the fear-inducing drop-offs.

Sunbeams shine through the top of Antelope Canyon and shoot down to the sand path between the stones
Sunbeams at Upper Antelope Canyon

DAY THREE: Zion National Park to Antelope Canyon

How to visit Antelope Canyon

The drive from Zion National Park to Antelope Canyon is about 2.5 hours. NOTE: As you leave Springdale en route to Page, Arizona, you will drive through a small portion of Zion National Park. Be sure to have your receipt handy from the day before.

There’s a good chance you’ve seen the iconic photos of sunbeams shining through Antelope Canyon, and if you haven’t, please see above! There are a few things you need to know if you wish to witness the sunbeams with your own eyes. First, you can only access Antelope Canyon with a tour group. We went with Antelope Slot Canyon Tours. There is an Upper Antelope Canyon tour and a Lower Antelope Canyon tour, which require separate tickets. To view the sunbeams, you must have a ticket for Upper Antelope Canyon. During the visit, you stop for photos and information on your walk through the canyon, and on your trip back, you walk straight through without stopping. We booked the 10:30 am tour, and the sunbeams were not visible on our first trip through the canyon, but they were on our return trip. Luckily, our tour guide let us stop for a minute to snap a few photos. The best time to view the sunbeams will depend on the time of year you visit (I visited in late August). When planning this trip, I read the prime sunbeam viewing slots were fully booked well in advance. I booked our tickets about two months out with no issue getting a time slot.

A path through the stone walls of Antelope Canyon
Upper Antelope Canyon
Sunlight pours through the top of Antelope Canyon
Sunbeams at Upper Antelope Canyon

Pro Tip: Get to the front of your tour group to capture photos without a bunch of people and to ensure you hear all the information. It also might not hurt to make friends with your tour guide. My guide was very familiar with photographing the canyons and used my phone to demonstrate the best photography tricks to the group. I ended up with mind-blowing images while enjoying the experience through my own eyes instead of through a screen. It was a priceless experience! If this happens to you, don’t forget to tip your guide – I mean, you should tip them either way but throw in a little extra if they capture the experience for you!

A few other things to note about visiting Antelope Canyon: Antelope Slot Canyon Tours provided transportation to the canyons that were basically a pick-up truck with seats installed in the bed and part of the trip was through dusty roads or sand. The entire trek through the canyons (about ¾ mile each way) is also sand. Be prepared to get a little dirty. If you’re snapping pictures, make sure your flash is off and feel free to ask your guide about camera settings before your tour starts. Our guide changed something on my camera (I have NO clue what she did), and I was stunned by the photo quality!

A view of the river bending around the canyons at Horseshoe Bend
Horseshoe Bend

Things to do in Page, Arizona

After you return from Antelope Canyon, refuel with a plate of barbeque and an ice-cold drink at Big John’s Texas BBQ. After lunch, head to Horseshoe Bend, which is about a 15-minute drive. There is a large parking lot at the base of the path to Horseshoe Bend, and parking is $10/vehicle. Fair warning: The trail from the parking lot to Horseshoe Bend is approximately ¾ mile. It’s a sandy path, and there is no shade, so dress accordingly and bring fluids, especially in the summer months.

If you’re still up for a little exploring after all your morning activities, take a drive to the edge of Page to visit the Glen Canyon Dam – Carl Hayden Visitor Center. You most likely drove across the dam as you arrived from Springdale. The visitor center is an excellent stop if you’re looking for something with air conditioning (after Antelope Canyon and Horseshoe Bend, you’ll probably really appreciate an AC break!). At the visitor center, you can learn about the dam and the powerplant, view interactive exhibits, and watch an introductory film. Afterward, pull out that 7-day National Parks Pass again and head down the road to the Glen Canyon National Recreation Area. There are public restrooms here, so change into your swimsuit and take a dip in Lake Powell!

Page, Arizona Accommodations

Page, Arizona isn’t a large city, but most of the standard hotel chains have properties, and there are some Airbnb options. We chose the Best Western View of Lake Powell Hotel, which had a small pool and a quaint outdoor seating area that we utilized once the temps dropped.

The rock formations and canyons that make up the Grand Canyon
The Grand Canyon from the South Kaibab Trail (South Rim)

DAY FOUR: Antelope Canyon to Grand Canyon

Hit the road nice and early to make the 2.5-hour drive from Antelope Canyon to the Grand Canyon. Keep that park pass handy as you’ll need it to enter the Grand Canyon National Park to gain access to the South Rim.

Grand Canyon South Rim Hikes

The South Rim is the portion of the Grand Canyon that is closest to Page, AZ and offers parking, a large visitor center, and trail access. There is a shuttle that will take you to several stops along the rim of the Grand Canyon. I recommend catching the Kaibab Rim (Orange) Route shuttle to the South Kaibab Trailhead and follow the South Kaibab trail into the Grand Canyon. We started around 10 am, climbing past Ooh Aah Point on our way to Cedar Point. The trail continues into the canyon, but since going up is mandatory, we decided it was a good time to start the climb back to the top. A mile and a half is nothing going down, but going up, it’s a whole different beast! We made frequent stops due to the steepness and lack of shade (we did have shade on the way down), and it took twice as long to climb up as it did to get into the canyon. Once you’re back up to the rim, you can hop the shuttle to another lookout area or head back to the Visitor Center.

The sign for Ooh Aah Point on the South Kaibab Trail in the Grand Canyon
Ooh Ahh Point on the South Kaibab Trail

Grand Canyon Tips

    • Going down is optional, coming up is mandatory. Remember this as you’re making your way into the canyon.
    • The farther down you climb, the warmer it gets. Bring plenty of water and snacks, pack extra sunscreen, and bring a hat and a small towel. I had all of these with me and did not regret it!
    • Yavapai Lodge is available via shuttle and is a quick spot to grab a bite to eat. It isn’t anything fancy, but it’s a good opportunity to re-energize.
    • There are stores by the Yavapai Lodge if you’re looking to snag a little souvenir.

Grand Canyon to Phoenix

It’s a 3-hour drive from the Grand Canyon to Phoenix, AZ. Since Sky Harbor International Airport was our final destination, we chose to make the drive after the Grand Canyon rather than staying near the park and leaving early the next morning. We stayed at the Courtyard Phoenix Downtown. Grab Mexican for dinner at Poncho’s, a recommendation made by our Uber driver. It is just what the doctor ordered after a long day of hiking and driving. If you have time before you head to the airport the next morning, walk over to Breakfast Club for a filling meal before a day of travel.

Southwest national parks 4-day road trip wrap-up

This Southwest National Parks road trip itinerary is the perfect trip for those in the mood to experience several starkly different environments in one trip without an insane amount of driving. No drive time longer than 3 hours and activities for all adventure levels. What more could a road tripper want?

Like this post? Pin it and save for later!

Images of Horseshoe Bend, a shadowy stone path through Antelope Canyon, and the Grand Canyon
The sunbeam shining through the top of Antelope Canyon into the dark stone-lined trail

Sharing is caring!

Megan Beckley

Megan Beckley

I’m a wandering Virginia girl with a serious thirst for travel. When I’m on the road, I’ve got one goal: create an authentic experience without breaking the bank. When I’m not traveling, I maintain my 9-5 work-life while carving out time to play tourist in my own city.

YOU MAY ALSO LIKE

This Post Has One Comment

  1. Catherine Williams

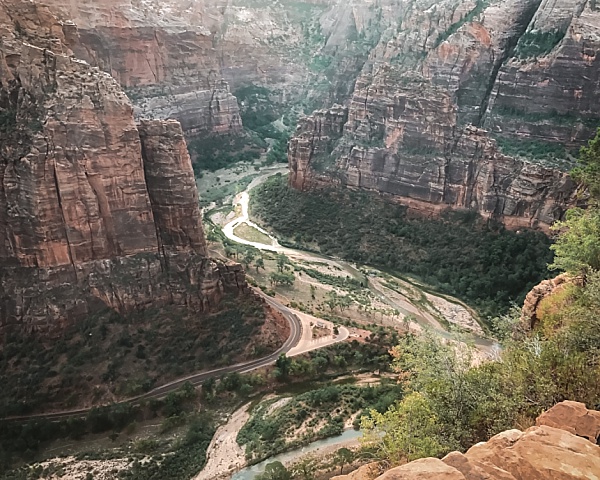
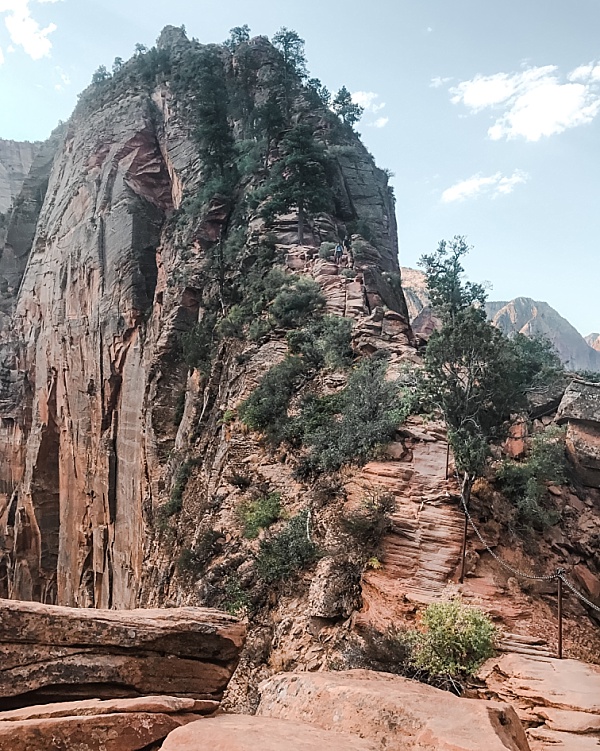
    Amazing trip! Definitely resurrected the adventurous side of me. Angels Landing was one of the scariest things I’ve ever done. Wouldn’t have missed it for anything and would definitely do it again. Thanks Megan!

Comments are closed.